2021 Camellia Celebration – Camellia Care
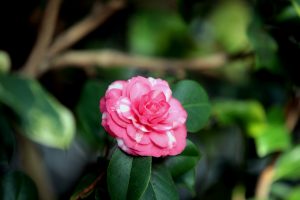
Camellia japonicas really are resilient plants that can fill a shady spot in your garden with fabulous early blooms before much else in the garden is awake. They don’t take much looking after as long as you find the right place for them, either planted in the ground or in a pot on the patio. This week, Gardener Georgina Sydenham is giving us a walk through on finding the ideal spot for your camellias at home.
“In the wild Camellia japonica live in woodlands and mountain soils – open, gritty soils, rich in organic material. Their roots are fine, fibrous and densely crowded, as they grow in naturally fertile soils constantly being nourished by falling leaves– so the roots don’t extend far from the base of the plant and are also quite shallow as they don’t need to go deep down into the subsoil searching for nutrients. So ideally they need well-draining, nutrient rich soil which are either neutral or acidic, but it is surprising how tolerant they are and are able to thrive in less than ideal conditions too. There are some definite caveats though:
They are lovers of acid soil. They are not as fussy as other acid loving plants, such as rhododendrons and thrive on neutral to acid soils. In alkaline soils the lime locks up nutrients that acid loving plants can’t then access.
Plant away from shallow-rooted trees such as yew or cypress who will compete for water – much better an oak that draws water from deep beneath the subsoil and provides dappled shade.
They prefer a sheltered position from cold, drying winds. Camellias in the wild are used to low temperatures – it’s the freezing winds they don’t appreciate. Especially in pots, the roots can be temporarily frozen so water can’t be taken up. That’s fine unless at the same time they are in a windy position which increases the water loss from their evergreen leaves which then become dry and drop so the plant slowly dies from a lack of water. So, try to give them some shelter from the wind.
Partial or dappled shade is ideal. They will grow happily in shade or sunny positions – they may just not always flower as reliably. They are a good solution for a north wall, especially in urban settings which are normally well sheltered. Do avoid east-facing positions that are exposed to direct sunlight as this can burn buds on frosty spring mornings.
Planting
Before check that the root-ball is well watered, soak it in a bucket of rainwater for a little while prepare you planting area or pot.
Planting in the ground. Dig a hole three times the width and twice the depth of the root-ball. Knock the plant out of its pot and gently tease out the roots if tightly matted. Place the plant in the hole ensuring the pot soil is level or slightly above the level of the garden soil. Do not let the level of the pot soil be below the level of the garden soil. Backfill with a 50:50 mix of ericaceous compost with your garden soil. Pack the soil down gently using your hands, avoid treading down the soil as you would for other shrubs. Camellias, like rhododendron have delicate, fibrous, shallow roots so they do not like densely packed soil. Next water in gently, preferably with rainwater, take care not to waterlog the roots. Next apply a thin layer of mulch around the base of your plant, ideally composted leaf-mould or shop-bought specific ericaceous compost – Try not to over mulch – you could end up burying the roots too deeply.
Planting in pots. Plant into a pot that is just 2 times the volume of the previous pot, no larger. Make sure it has drainage holes and put some coarse gravel to prevent the holes getting blocked with soil. Knock the plant out of its pot and gently tease out the roots if tightly matted. Using an ericaceous compost, backfill around the plant ensuring that it is at the same level as the previous pot. Apply a thin layer of mulch, such as bark or leaf-mould. Then water your pot well, ideally with rainwater.

After care
When planted in the garden it is enough to mulch once a year, in early spring to shade the roots, prevent the growth of weeds (and any subsequent root disturbance from garden forks) and help to maintain moisture levels. More frequently than this may end up burying the roots too deeply. A simple mix of garden compost and leaf-mould should be enough. You can use a special ericaceous fertilizer if your plants show signs of lacking some nutrients but do not dig in as you will disturb the roots. Better to gently rake into the top 2cm of soil, and water in, or mixed in with the mulch. Apply fertiliser under the outer branches where most of the feeding roots are. Remember to keep watering new plants for the first few years until established.
When planted in pots you must ensure that the soil is always moist, never very wet, preferably with rainwater. After flowering is a good time to re-dress your pot – scrape off what is left of any of the old mulch apply a small amount of ericaceous slow–release fertilizer and then re-apply a thin layer of mulch and then water-in well.
Generally camellias don’t require regular pruning except for taking out dead and diseased wood. Thinning out a few branches to aid ventilation can help if they are becoming affected by pests and disease. Lightly tip-pruning just after flowering encourages more shoots to grow for a bushier plant. Healthy older plants tolerate hard pruning if they are out-growing their space – this will encourage new shoots from lower down. And before you throw them on the compost heap, Camellia pruning’s are sought after for floral displays – the glossy surface works well in artificial light settings and the leaves lasts extremely well.
Common Problems
Camellias are usually very robust and healthy, here are some of the most common concerns:
The leaves are looking pale green or yellow – Most commonly a condition known as Chlorosis, it is often a sign that the plant isn’t getting nutrients to its leaves. This can be due to under–watering (no water), over-watering (roots are rotting so unable to take up water), no nutrients in the soil (so no nutrients available), or nutrients are available but can’t be accessed by the roots. The last one is an issue in acid-lovers and a drench of a ‘sequestered iron’ solution should fix the immediate issue although it can take some weeks to see the improvement in the leaf colour. Whatever the cause you may find a longer-term solution is to refresh the soil around the roots so that they are in a moist but well-draining, slightly acidic soil.
Flowers are prematurely turning brown – Petal blight is where light brown patches appear caused by a fungal infection. Clear away affected petals to prevent spores getting into the soil, and improve ventilation if possible to lower humidity that fungal infections thrive in.
Leaves covered in black soot – Sooty mould is a black, soot-like fungus on leaves that attaches to the sticky honeydew residue from insects, especially aphids and mealy bugs. It is mostly unsightly but if left too long it can cover the leaves and impact on photosynthesis, eventually making the plant look unwell. Gently clean the leaves with a mild soapy mixture e.g. Castile soap which is a gentle detergent based on vegetable oil. (Normal washing–up liquid is too harsh and will remove the top layer of the leaves.)
Ants and aphids are gathering on new growth – The ants farm the aphids as they love the sticky honeydew they produce when sucking sap from new buds and leaves. It’s simple to just rub the aphids off as they appear – they generally don’t return to the same buds. If you have too many plants then you can use a soap-spray, again ‘Castille soap’ is suitable. It only kills the bugs it smothers in soap so doesn’t affect any other insects that come along later.
Twigs and buds are covered in cigarette ash! – No, it’s not a secret smoker in your bushes, it’s mealy bugs – they are mostly a problem indoors or where there is poor ventilation. Again, they secrete honeydew to which sooty mould attaches. They are difficult to see and again the solution is to soak the leaves with a castile soap–based spray and use a small brush to remove the ash-like deposits.
Not flowering – This is usually due to lack of water, either in the summer months (June to October) when the buds need water as they start to form, or later in the year the buds drop off if there is a wide fluctuation in the watering regime or in temperature. Keep an eye on moisture levels in pots during the summer and give the roots a mulch to assist in keeping root temperatures consistent. If placed in the right location then this shouldn’t be too much of an issue. Another common reason is pruning at the wrong time of year and so you are cutting off next year’s flowers. Always prune straight after flowering to avoid this problem.”